
How to Make a Swamp Cooler Colder and More Efficient
November 5, 2018 4:28 pmIf your unit is running but the air feels lukewarm, how to make a swamp cooler colder usually comes down to a short list of fixes: wetter pads, balanced airflow, clean media, and a realistic view of what outdoor humidity allows. A swamp cooler, also called an evaporative cooler, chills air by pulling it through water-soaked pads, so every part of that process affects the temperature you feel at the vent.
The good news is that most performance problems are simple to correct, and the same steps that make the air colder also lower running costs. Whether you own a rooftop system, a window unit, or one of the evaporative coolers designed for homes used across the dry West, the advice below will help you get the most cooling out of every gallon of water.
What Limits How Cold a Swamp Cooler Can Get
Before changing anything, it helps to know the ceiling. A direct evaporative cooler cannot cool air below the wet-bulb temperature, which is the lowest temperature air can reach by evaporating water into it. According to a technology review from the U.S. Department of Energy and the National Renewable Energy Laboratory, a well-built system typically aims to reach 90% to 95% of that limit.
Humidity Sets the Floor
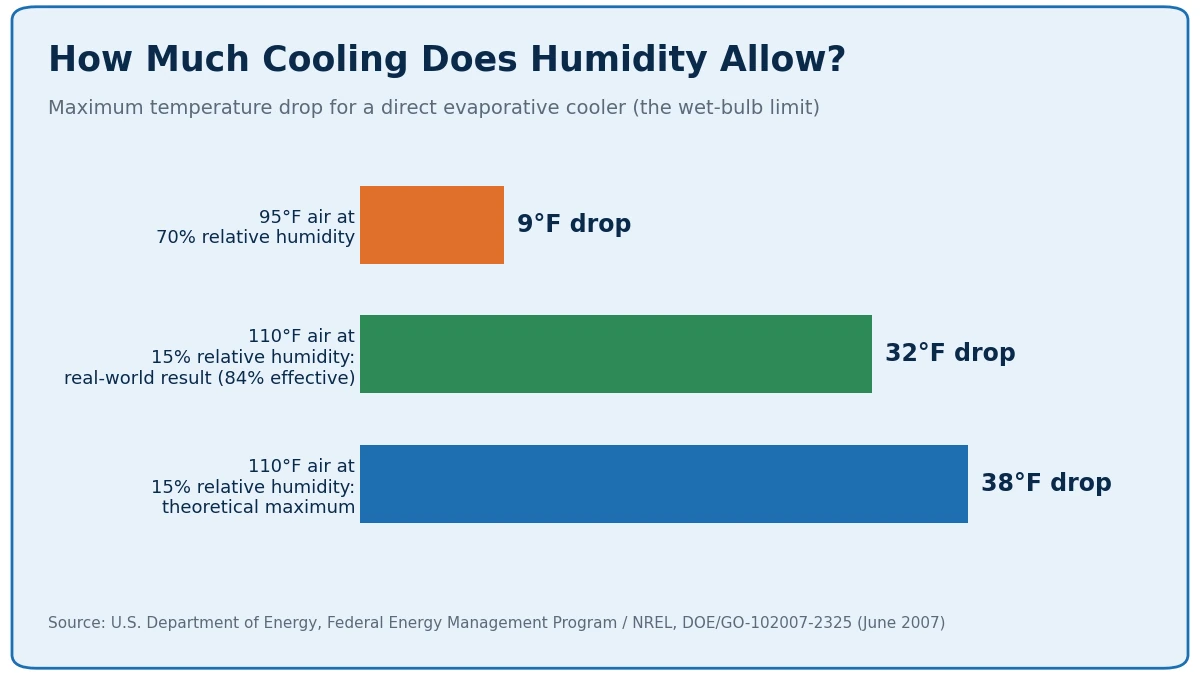
Dry air can absorb a lot of water vapor, so evaporation removes a lot of heat. Humid air is already close to saturation, so very little cooling is available. The federal data below shows how dramatic the gap can be.
Source: Coolerado Cooler Helps to Save Cooling Energy and Dollars (NREL and U.S. DOE)
| Condition | What the data shows |
|---|---|
| 110°F outdoors, 15% relative humidity | Wet-bulb temperature of 72°F, so up to 38°F of cooling is possible. A tested unit achieved 32°F, or 84% effectiveness. |
| 95°F outdoors, 70% relative humidity | Air can be cooled only about 9°F before it reaches saturation. |
| Target performance | Direct coolers aim to reach 90% to 95% of the wet-bulb temperature. |
| Small portable evaporative coolers | Typically lower a single room by 5°F to 15°F, per the U.S. Department of Energy. |
Why the Rest of the System Still Matters
You cannot change the weather, but you can control how close your cooler gets to the wet-bulb limit. Pad condition, water flow, airflow, and exhaust path all decide whether you capture 60% of the available cooling or 90%. That is where the following fixes come in.
How to Make a Swamp Cooler Colder: 9 Proven Fixes
1. Prime the Pads Before the Fan Starts
Dry pads are the most common reason for a warm first blast of air. Fill the reservoir, switch on the pump only, and let the media soak until every inch is visibly wet, usually a few minutes. Only then should you start the fan. Keep the water level topped off during the first hour, because fresh pads absorb a surprising amount of water.

2. Open Windows So Moist Air Can Leave
Many owners are surprised that a swamp cooler works best with windows partly open. Unlike an air conditioner, it brings in fresh outdoor air continuously, and the cooled, moist air has to be exhausted instead of recirculated. The federal technology review describes direct evaporative coolers as open systems that require windows or exhaust vents to stay open.
Crack a window in each room you want cooled, start with a couple of inches, and add more until you feel steady airflow moving through the room. If the air feels clammy or heavy, open the windows a little wider. Opening windows on the side of the home opposite the cooler pulls the cool air across the whole space.
3. Move the Cooler to a Shaded Spot With Fresh Air
Intake air that has already been heated by a sun-baked wall or a dryer vent starts the process at a disadvantage. If your unit is portable or window-mounted, place it on the shadiest side of the home with an unobstructed intake. Keep it away from exhaust vents, hot pavement, and reflective surfaces. For a portable unit, aim the discharge at the seating or sleeping area, because moving air on skin makes you feel several degrees cooler.
4. Replace Worn or Mineral-Clogged Pads
Scale, dust, and worn fibers choke airflow and reduce the surface area available for evaporation. If water runs down the media in streaks instead of soaking evenly, or you see white crust and dry patches, it is time for new media. Fresh replacement evaporative cooler media restores the even, saturated surface that makes the air colder, and it often improves airflow at the same time.
5. Upgrade to Higher-Efficiency Media
Not all pads perform the same. Rigid cellulose media is engineered to hold more water, resist sagging, and last for several seasons. Upgrading from loose aspen to a structured product such as rigid CELdek cooling media gives the airstream a longer, more uniform path through wet surface area, which helps the unit approach its wet-bulb limit.
6. Flush Minerals and Use Bleed-Off
Every gallon that evaporates leaves its minerals behind. Left alone, they harden into scale that blocks pads, clogs distribution tubes, and weakens cooling. The federal review notes that direct coolers need periodic bleed-off to avoid mineralization. A bleed-off line, or a regular partial drain and refill, keeps the mineral concentration in the sump low.
Source: Coolerado Cooler Helps to Save Cooling Energy and Dollars (NREL and U.S. DOE)
The trade-off is water. Bleed-off systems used more than twice as much water in the Phoenix study, so many owners choose a scheduled drain and rinse instead. Either approach beats letting scale accumulate. Always unplug the unit first, scrub the reservoir with a mix of clean water and white vinegar, and rinse thoroughly before refilling.
7. Check the Belt, Pump, and Water Distribution
A slipping belt reduces airflow, and a weak pump leaves the top of the pads dry. Inspect the belt for glazing and proper tension, confirm the pump is pushing water evenly through every distribution tube, and make sure the float shuts off the supply valve at the right level. Worn parts are inexpensive to swap, and a full selection of evaporative cooler parts and accessories makes it easy to restore factory performance.
8. Right-Size the Airflow for Your Space
Evaporative coolers are rated by the cubic feet per minute (CFM) of air they deliver, and sizing is based on the square footage of the space and the number of air changes it needs per hour. An undersized unit never gets ahead of the heat, while an oversized one can leave a space damp. If you are unsure whether your cooler matches your space, review the cooler airflow and sizing specifications and compare them to your room dimensions.
9. Cut Heat Gain So the Cooler Has Less to Fight
Close blinds on sun-facing windows, run heat-producing appliances early or late in the day, and keep doors to unused rooms closed so cooled air goes where people are. For a garage, workshop, or single room, portable swamp coolers for single rooms concentrate the cooling where you need it instead of asking one large system to cover everything.
Swamp Cooler Efficiency and Running Costs
A colder cooler is also a cheaper one to run. The U.S. Department of Energy reports that evaporative coolers cost about half as much to install as central air conditioners and use about one-quarter as much energy. The federal technology review backs this up with measured power draw per ton of cooling.
Sources: Coolerado Cooler Helps to Save Cooling Energy and Dollars (NREL and U.S. DOE) and U.S. Department of Energy Energy Saver
The cost figures in that review come from 2005 pricing and small-office equipment, so treat the dollar amounts as a comparison rather than a quote. The power comparison is the useful part: a fan and a small pump draw a fraction of what a compressor does.
Efficiency also depends on build quality. An evaporative cooling equipment manufacturer that has been engineering coolers since 1983 designs housings, wet sections, and airflow paths so more of the available wet-bulb cooling reaches the room instead of leaking away.
Consider a Two-Stage Cooler for Hotter, Stickier Days
If your region is dry most of the summer but gets humid during monsoon season, a two-stage design is worth a look. The Department of Energy notes that two-stage evaporative coolers use a pre-cooler, more effective pads, and more efficient motors, and they add less humidity to the home than single-stage units.
Common Shortcuts That Do Not Help
- Dumping ice in the reservoir: The recirculating water settles close to the wet-bulb temperature, so any chill fades fast.
- Running a dehumidifier alongside the cooler: The cooler is designed to add moisture and exhaust it through open windows. A dehumidifier works against that and wastes power.
- Sealing the house like you would for air conditioning: Closed windows trap moist air and slow the cooler down.
- Using the cooler in humid weather: Little moisture can be added, so there is little cooling. The Department of Energy recommends evaporative cooling for low-humidity areas.
Seasonal Maintenance Schedule
The Department of Energy calls for simple maintenance about once a month during use and a major cleaning each season. This schedule keeps the cooler close to its best output all year.
| When | What to do |
|---|---|
| Start of season | Clean debris, scrub the reservoir, install fresh pads, check the belt and pump, inspect water lines for leaks, and run the pump before the fan. |
| Monthly | Look for dry spots on the pads, confirm even water flow, flush or bleed off minerals, and top off or drain the reservoir as needed. |
| Mid-season | Check belt tension, listen for bearing noise, and replace any pads that are crusted or crumbling. |
| End of season | Drain the system, remove scale, dry the cabinet, and cover the unit if it will sit idle. |
Quick Checklist: How to Make a Swamp Cooler Colder This Week
Before You Turn It On
- Disconnect power, then clean the intake grill, fan, and outlet with a vacuum.
- Scrub the reservoir with water and white vinegar, then rinse well.
- Replace pads that are scaled, sagging, or musty.
- Run the pump alone until the media is fully saturated.
While It Runs
- Crack a window in each room you want cooled.
- Close blinds on sun-facing glass and keep unused rooms closed off.
- Watch for dry streaks on the pads and fix water flow quickly.
- Skip the dehumidifier and the ice.
When to Call a Specialist
If you have primed the pads, balanced the windows, and installed clean media, but the air is still not as cold as it should be, the issue may be sizing, a failing motor, or a distribution problem that needs a trained eye. You can talk with an evaporative cooling specialist about your setup, and we will help you decide whether a repair, new media, or a different unit is the right move.
| Request a Free Evaporative Cooler Consultation |
Frequently Asked Questions About Making a Swamp Cooler Colder
How much colder can a swamp cooler make the air?
It depends on the outdoor wet-bulb temperature. In a U.S. Department of Energy and NREL example, 110°F air at 15% relative humidity could theoretically drop 38°F, and a typical unit delivered a 32°F drop. In humid air, the same cooler may manage only a single-digit drop. Small portable units usually lower a single room by roughly 5°F to 15°F, according to the Department of Energy.
Why does my swamp cooler blow warm air when it first starts?
The pads are probably dry. Run only the pump for a few minutes so the media is fully saturated, then switch on the fan. Dry pads cannot evaporate much water, so the first blast of air passes through almost unchanged.
Does opening a window make a swamp cooler colder?
Yes, indirectly. A swamp cooler is an open system, so moist air has to leave the house while fresh air is pulled through the pads. Cracking a window in each room you want cooled lets the airflow keep moving and prevents humidity from building up and weakening the cooling effect.
Does adding ice or cold water to the reservoir help?
Only briefly. Ice can create a short burst of cooler air, but the recirculating water settles near the wet-bulb temperature of the incoming air, so the benefit fades quickly. Clean pads, steady airflow, and dry outdoor air matter far more.
Should I run a dehumidifier with my swamp cooler?
No. A swamp cooler adds moisture on purpose and relies on open windows or vents to exhaust it. A dehumidifier fights that process, uses extra electricity, and does not make the cooler’s air any colder.
How often should I clean a swamp cooler?
The Department of Energy recommends simple maintenance about once a month during the cooling season, plus a major cleaning every season. That includes scrubbing the reservoir, clearing mineral deposits, and checking the pads, pump, and belt.
Do swamp coolers work in humid climates?
They struggle. The Department of Energy advises against using evaporative coolers in humid climates because there is little room for added moisture, so the temperature drop is small and indoor humidity rises.
What is a two-stage evaporative cooler?
A two-stage unit uses a pre-cooling stage, more effective pads, and more efficient motors. According to the Department of Energy, it is newer, more efficient, and adds less humidity to the home than a single-stage cooler.
How much water does a swamp cooler use?
In a study of 46 Phoenix homes cited by NREL, coolers used about 4.4 gallons per hour without bleed-off and about 10.4 gallons per hour with bleed-off, averaging roughly 7.6 gallons per hour across all systems.
How do I know when the cooling pads need to be replaced?
Replace them when you see heavy mineral scale, a persistent musty smell, dry spots that stay dry, crumbling media, or weaker airflow after cleaning. Many owners install fresh pads at the start of every cooling season.
Categorised in: Evaporative Cooling
This post was written by Premier Industries Team